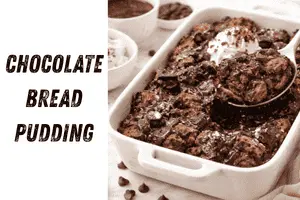
Here is a short video explaining the process, scroll down for detailed ingredients and step by step recipe method. Thanks for coming and do not forget to check other recipes on our homepage.
Table of Contents
Ingredients with Exact Amounts
Before you start baking, it is important to gather everything you need and measure it out correctly. Baking is a science, and even small differences in measurements can change the final result. Below is everything you need to make one perfect batch in an 8×8-inch pan, which yields about 12 to 16 bars depending on how you slice them.
For the Graham Cracker Crust
The crust is the foundation of these bars, and getting it right makes a huge difference. You want it firm, buttery, and just slightly sweet so it complements the creamy filling without overpowering it.
- 1½ cups graham cracker crumbs (about 10 to 12 full graham cracker sheets, finely crushed)
- 3 tablespoons granulated white sugar
- 6 tablespoons unsalted butter, melted
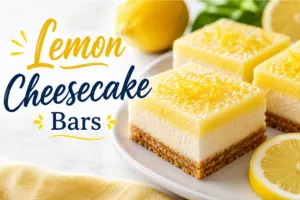
For the Lemon Cheesecake Filling
This is the star of the whole recipe. The quality of your ingredients here really matters, so use full-fat cream cheese and fresh lemons wherever possible. The difference in flavor between fresh lemon juice and bottled lemon juice is night and day.
- 16 oz (2 standard blocks) full-fat cream cheese, softened to room temperature
- ½ cup granulated white sugar
- 2 large eggs, room temperature
- 3 tablespoons fresh lemon juice (from approximately 1 to 2 lemons)
- 1 tablespoon fresh lemon zest (from approximately 1 large lemon)
- 1 teaspoon pure vanilla extract
Optional Toppings
These are completely optional, but they add a lot of visual appeal and extra flavor. If you want to serve these bars at a party or make them look extra special, a topping goes a long way.
- 2 to 3 tablespoons powdered sugar for dusting
- ½ cup lemon curd (store-bought or homemade) swirled on top before baking, or spread after chilling
- Fresh berries such as raspberries, blueberries, or sliced strawberries
- Lightly sweetened whipped cream for serving
Equipment You Will Need
Having the right tools ready before you start saves time and reduces stress in the kitchen. You do not need anything specialized for this recipe, which is part of what makes it so beginner-friendly.
- 8×8-inch square baking pan
- Parchment paper
- Mixing bowls (one medium, one large)
- Electric hand mixer or stand mixer
- Silicone spatula
- Microplane or fine grater (for zesting)
- Fine mesh strainer (for straining lemon juice)
- Measuring cups and spoons
Step-by-Step Recipe Method
This is the core of the whole post, so read through every step carefully before you begin. Going through the recipe once in your head before you start baking helps you understand the flow and avoids any surprises halfway through. Follow each step in order and do not rush any part of the process, especially the chilling stage at the end.
Step 1 — Preheat the Oven and Prepare the Pan
Start by preheating your oven to 325°F (163°C). This slightly lower temperature is intentional — baking cheesecake at a lower heat gives you a creamier texture and reduces the risk of cracking. While the oven is heating up, take your 8×8-inch baking pan and line it completely with parchment paper. Make sure to press the parchment into the corners and let a couple of inches hang over each side. This overhang is very important because it acts as handles when you lift the bars out of the pan later for slicing. Lightly grease the parchment with a small amount of butter or cooking spray just to keep it in place.
Step 2 — Make the Graham Cracker Crust
Add your graham cracker crumbs and sugar to a medium mixing bowl and stir them together until combined. If you are crushing your own crackers, place them in a zip-lock bag and roll over them with a rolling pin until you have fine, even crumbs. You do not want large chunks in the crust because they will make it crumbly and uneven. Pour in your melted butter and stir everything together until the mixture looks like wet sand and all the crumbs are evenly moistened. If you pick up a pinch and press it between your fingers, it should hold together. Pour this mixture into your prepared pan and use the bottom of a measuring cup or glass to press it down firmly and evenly across the entire bottom of the pan. Make sure the crust is packed tightly and reaches all the corners. Place it in the preheated oven and bake for 10 minutes, just until it is lightly golden and set. Remove it from the oven and let it cool for at least 10 minutes before adding the filling.
Step 3 — Zest and Juice Your Lemons
This step sounds simple, but there is a right order to do it and a few things to watch out for. Always zest your lemons before you juice them — once you cut and juice a lemon, the rind becomes soft and flat, making it almost impossible to grate properly. Start by rinsing your lemons under cold running water and patting them dry with a kitchen towel. Hold your microplane over a small bowl and grate the outer yellow layer of the lemon skin in long, downward strokes. You are only after the bright yellow part — the moment you see white underneath, stop. That white layer is called the pith, and it is bitter. It will throw off the flavor of your entire filling if you include it. Once you have your zest, cut the lemons in half, roll them firmly on the counter with the palm of your hand to loosen the juice inside, and then squeeze them. Pour the juice through a fine mesh strainer into a small bowl to catch any seeds or pulp. You want a clean, smooth juice going into your filling.
Step 4 — Make the Lemon Cheesecake Filling
This is the most important step and the one that requires the most care. Start with your softened cream cheese in a large mixing bowl. It must be fully at room temperature — if it is even slightly cold, you will end up with a lumpy filling that does not smooth out no matter how long you beat it. Beat the cream cheese on medium speed with your electric mixer for about 2 minutes until it is completely smooth and creamy with no lumps at all. Add the sugar and beat again for another minute until fully incorporated and fluffy. Now add the lemon juice, lemon zest, and vanilla extract, and mix on low speed just until everything comes together. Scrape down the sides of the bowl with your silicone spatula to make sure nothing is stuck. Now here is a critical tip — when it comes time to add the eggs, put down the electric mixer. Add one egg at a time and fold it in gently using your silicone spatula rather than beating it with the mixer. Beating the eggs vigorously traps air inside the batter, and that air expands in the oven and causes the top of your cheesecake bars to crack. Folding them in by hand gives you a smooth, dense, crack-resistant filling.
Step 5 — Pour the Filling Over the Crust
Once your crust has cooled and your filling is ready, pour the filling gently over the pre-baked crust. Use your silicone spatula to spread it evenly from edge to edge, making sure it is level across the whole surface. If you are adding a lemon curd swirl, drop small spoonfuls of lemon curd across the top of the filling now, and use a toothpick or skewer to drag them into swirl patterns. Do not dig too deep into the filling — just swirl the surface. If you are keeping the bars plain, simply smooth the top and move on to baking.
Step 6 — Bake the Bars
Place the pan on the middle rack of your preheated oven. Bake at 325°F for 30 to 35 minutes. You will know the bars are ready when the edges look completely set and firm, but the center still has a gentle wobble when you give the pan a small shake. That slight jiggle in the middle is exactly what you want — it will firm up perfectly as the bars cool and chill. Do not be tempted to keep baking until the center looks completely solid, because by then the edges will be overbaked, and the texture of the whole bar will suffer. If the top starts to look golden or brown, your bars have gone too far. They should be pale, creamy, and just barely set in the middle when you take them out.
Step 7 — Cool at Room Temperature
Once you remove the bars from the oven, set the pan on a wire cooling rack and leave them alone at room temperature for at least one full hour. Do not try to speed this up by putting them in the fridge while they are still warm. A sudden temperature change can cause the filling to crack or become uneven. Let them come down to room temperature naturally. The bars will continue to set as they cool, so even though the center may still look slightly soft when you first take them out, it will firm up during this cooling period.
Step 8 — Refrigerate Until Fully Chilled
After the bars have cooled to room temperature, cover the pan loosely with plastic wrap or aluminum foil and transfer it to the refrigerator. Let them chill for a minimum of 4 hours, but overnight is even better. Chilling is not optional — it is what transforms the filling from soft and wobbly into a firm, sliceable, creamy cheesecake texture. If you try to cut them before they are fully chilled, they will be too soft to hold their shape and you will end up with a messy, uneven cut. If you are making these for an event or gathering, make them the night before and let them chill overnight. They will be in perfect condition the next day.
Step 9 — Slice and Serve
When you are ready to serve, lift the entire slab of cheesecake bars out of the pan using the parchment paper overhang and set it on a cutting board. Fill a tall glass with warm water and dip a sharp knife into it before every single cut. Wipe the blade clean with a paper towel between cuts as well. Warm, clean cuts give you those beautiful, sharp edges that make the bars look professional and neat. Cut them into 12 bars for a generous size or 16 for smaller, bite-sized portions. If you are dusting with powdered sugar, do it right before serving — powdered sugar absorbs into the filling over time and disappears if you add it too early. Add your toppings, plate them up, and serve chilled.
Variations in the Recipe
One of the best things about lemon cheesecake bars is how easy they are to customize. Once you have the base recipe down, you can change up the flavors, the crust, and the toppings in so many different ways. Here are some of the most popular and delicious variations worth trying.
Raspberry Lemon Cheesecake Bars
This is one of the most beautiful and crowd-pleasing variations you can make. The tartness of raspberry pairs incredibly well with the bright citrus of lemon, and the color contrast between the deep pink raspberry swirl and the pale yellow cheesecake filling looks stunning on a plate. To make this version, simply drop small spoonfuls of seedless raspberry jam or fresh raspberry puree across the top of the filling before baking, then use a skewer or toothpick to drag them into swirls. Use about 3 to 4 tablespoons of jam — you do not need a lot. The jam will set into the cheesecake as it bakes, creating a beautiful marbled look and a fruity burst in every bite.
Key Lime Cheesecake Bars
If you love the tropical, slightly more intense tang of key lime, this swap is incredibly easy to make. Simply replace the lemon juice and lemon zest in the filling with the same amounts of fresh key lime juice and lime zest. The filling will have a slightly greener tint and a sharper, more tropical flavor that pairs beautifully with the buttery graham cracker crust. You can also add a very thin layer of whipped cream on top after chilling and finish with a few thin lime slices for a beautiful presentation. This version is especially popular in summer.
Strawberry Lemon Cheesecake Bars
For a sweeter, softer variation, add fresh strawberry slices on top of the chilled bars right before serving, or blend a few strawberries into a simple compote and drizzle it over the top. You can also swirl a small amount of strawberry jam into the filling before baking, just as you would with the raspberry version. The natural sweetness of the strawberry softens the tartness of the lemon and makes this version feel very light and fresh. It is a great option if you are serving these bars to people who find straight lemon a little too tangy.
Gingersnap Crust Variation
Swapping the graham cracker crust for a gingersnap crust adds a warm, spiced base note that contrasts beautifully with the cool, tangy filling. To make a gingersnap crust, simply crush gingersnap cookies into fine crumbs and use them in place of the graham crackers, using the same amounts of butter and sugar. The slight heat and spice of the ginger plays off the lemon in a really interesting way. This variation is particularly popular in autumn and around the holiday season when warm spiced flavors feel more appropriate.
No-Bake Lemon Cheesecake Bars
If you want to skip the oven entirely, you can make a no-bake version of these bars. For the no-bake filling, beat together softened cream cheese, powdered sugar, lemon juice, lemon zest, and heavy whipping cream until thick and fluffy. Spread it over a chilled (not baked) graham cracker crust and refrigerate for at least 6 hours or overnight until completely set. The texture will be slightly lighter and fluffier than the baked version, but the flavor is just as bright and delicious. This is a great option in the summer when you do not want to heat up the kitchen.
Mistakes to Avoid
Even experienced bakers can run into problems with cheesecake bars if they are not careful. Most issues come down to a few very common mistakes that are completely avoidable once you know what to watch out for. Here is what goes wrong most often and exactly how to fix it.
Using Cold Cream Cheese
This is the number one mistake people make, and it ruins more batches of cheesecake bars than anything else. Cold cream cheese does not beat smoothly — it stays in small cold lumps no matter how long you mix it, and those lumps show up in your finished bars as dense, unpleasant chunks in an otherwise creamy filling. You must bring your cream cheese fully to room temperature before you start mixing. Take it out of the fridge at least 45 to 60 minutes before you plan to bake. If you are in a warm kitchen in summer, 30 minutes is usually enough. You are looking for cream cheese that feels soft and pliable when you press it with your finger, but has not become warm or greasy. Soft cream cheese beats into a perfectly smooth filling in seconds.
Overmixing the Filling
Overmixing is a surprisingly easy mistake to make, especially when you want to make sure everything is fully combined. The problem is that beating the filling too much — especially once the eggs are added — incorporates a lot of air into the batter. That trapped air expands in the oven as the bars bake, rises to the top, and causes the surface to crack. It can also cause the bars to puff up dramatically and then deflate as they cool, leaving you with a sunken, uneven surface. Mix the cream cheese, sugar, and flavorings until just smooth, and when you add the eggs, fold them in gently with a spatula rather than beating them in with the mixer.
Overbaking
Overbaking is one of the trickiest mistakes to avoid because the center of the bars will look underdone even when they are actually perfectly baked. Many first-time bakers keep the bars in the oven until the center looks completely firm, but by that point the edges are already overcooked and the whole filling has dried out. The texture becomes grainy and dense instead of creamy and smooth. The correct visual cue is a center that still wobbles slightly when you gently shake the pan, while the edges look set and do not jiggle at all. Trust the wobble and take the bars out. They will set completely during cooling and chilling.
Skipping the Parchment Paper
Skipping the parchment paper might seem like a minor shortcut, but it creates a major problem when it comes time to remove and slice the bars. Without the parchment lining, the crust sticks firmly to the bottom of the pan and the only way to get the bars out is to dig them out with a spoon, destroying both the shape and the clean edges in the process. Always line your pan with parchment before adding anything. Take the extra two minutes to do it properly, with the paper going up all four sides and overhanging the edges so you can lift the whole slab out cleanly when it is time to slice.
Cutting the Bars Too Early
Patience is genuinely one of the most important ingredients in this recipe. If you cut into the bars before they have fully chilled in the refrigerator, the filling will be too soft to hold its shape. You will end up with edges that crumble and fall apart, filling that smears rather than slices, and bars that look nothing like the clean, professional-looking slices you were hoping for. Even if the bars feel firm after just an hour or two in the fridge, give them the full four hours — and ideally overnight. The longer they chill, the better the texture becomes.
Using Bottled Lemon Juice
Bottled lemon juice is convenient, but it does not taste the same as fresh. The pasteurization process that bottled juice goes through removes a lot of the bright, volatile citrus compounds that give fresh lemon juice its sharpness and fragrance. Bars made with bottled lemon juice taste flat and artificial compared to bars made with fresh juice. Since lemon is the entire flavor profile of this dessert, it makes no sense to compromise on it. Buy fresh lemons, zest them before juicing, strain the juice, and use it the same day. The difference in the final result is immediately noticeable.
Not Pressing the Crust Firmly Enough
A loosely pressed crust crumbles and falls apart the moment you try to pick up a bar. It also does not hold its shape during baking, and you end up with a crumbly, sandy base that makes the bars difficult to eat neatly. Press the graham cracker mixture down firmly and evenly using the flat bottom of a measuring cup or glass. Get into every corner and make sure the layer is uniform in thickness throughout. A well-pressed crust bakes into a firm, cohesive base that holds the bar together from the first slice to the last bite.
Conclusion
Lemon cheesecake bars are one of those desserts that look impressive, taste incredible, and are genuinely simple to make once you understand the process. There are no complicated techniques, no special equipment, and no need for a water bath or a springform pan. You just need good ingredients, a little care during mixing, the patience to let them chill properly, and a warm knife for slicing. Whether you keep them classic with just a dusting of powdered sugar or dress them up with a raspberry swirl and fresh berries, they are going to be a hit every single time. Make them for your next gathering and watch them disappear from the plate in minutes. And when people ask you for the recipe — because they absolutely will — be generous and share it.
FAQs
Can I make lemon cheesecake bars ahead of time?
Yes, and honestly, making them ahead of time is actually the best approach. These bars need several hours in the fridge to set properly anyway, so making them the night before a gathering works perfectly. The flavor even improves slightly after an overnight rest in the fridge as the lemon has more time to develop throughout the filling. Store them covered in the refrigerator and they will be in perfect condition when you are ready to serve. They taste just as good on day two as they do on day one, and some people swear they taste even better.
How long do lemon cheesecake bars keep in the fridge?
Stored properly in an airtight container in the refrigerator, lemon cheesecake bars keep well for up to 5 days. Place a sheet of parchment paper between layers if you are stacking them in a container so they do not stick together. After 5 days, the crust begins to soften from the moisture of the filling and the texture of the whole bar changes. They are still safe to eat, but the quality is best in the first three to four days. Make sure the container is sealed tightly so the bars do not absorb any odors from the fridge.
Can I freeze lemon cheesecake bars?
Absolutely. These bars freeze very well, which makes them great for batch baking. Let the bars chill completely in the fridge first, then wrap each individual bar tightly in plastic wrap and place them all in a freezer-safe zip-lock bag or airtight container. They will keep in the freezer for up to 2 months. When you are ready to eat them, transfer them to the refrigerator and let them thaw overnight. Do not try to thaw them on the counter at room temperature — slow thawing in the fridge keeps the texture intact and prevents condensation from making the crust soggy.
Why did my cheesecake bars crack on top?
Cracking almost always comes from one of two causes — overmixing the filling or overbaking the bars. When you beat too much air into the filling, it expands in the oven and then collapses as it cools, leaving cracks in the surface. Overbaking causes the filling to dry out and contract, which also creates cracks. To avoid this, fold your eggs in by hand and pull the bars from the oven while the center still has a slight wobble. A cracked bar still tastes exactly the same, but if you want a clean, smooth surface, these two fixes will solve the problem.
Can I use low-fat or reduced-fat cream cheese?
You can, but the results will not be the same. Full-fat cream cheese is what gives these bars their rich, dense, creamy texture. Low-fat versions have a higher water content, which makes the filling looser, less stable, and sometimes slightly grainy after baking. The bars may not set as firmly and the overall richness of the flavor will be reduced. If you are looking to make a lighter version, a no-bake recipe with whipped cream folded in might give you better results than using reduced-fat cream cheese in a baked recipe.
What size pan should I use?
An 8×8-inch square pan is the standard size for this recipe and gives you a good, thick layer of cheesecake filling. If you want to make a larger batch for a crowd, you can double the recipe and use a 9×13-inch pan. The baking time will need to increase slightly — check at the 35-minute mark and go from there. Avoid using a round springform pan for this particular recipe, as the bars will turn out too thin and the proportions will be off. The square or rectangular pan is what gives you those perfectly defined, even bars.
Do I need a water bath to bake these?
No, and that is one of the best things about cheesecake bars compared to a full cheesecake. Because the filling layer is thinner than a traditional whole cheesecake, it bakes evenly at a lower temperature without needing the humidity of a water bath to prevent cracking. As long as you bake at 325°F, do not overmix the filling, and pull the bars out while the center still has a wobble, you will get a smooth, creamy result every time without the hassle of wrapping pans in foil or dealing with a roasting dish full of hot water.