Here is a short video explaining the process, scroll down for detailed ingredients and step by step recipe method. Thanks for coming and do not forget to check other recipes on our homepage.
Table of Contents
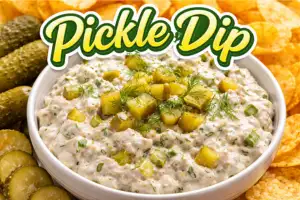
Ingredients with Exact Amounts
Getting the ingredient amounts right is important for this dip. Too much pickle juice makes it watery. Not enough cream cheese leaves it thin and loose. Here is exactly what you need and why each ingredient matters.
The Creamy Base
8 oz (1 block) cream cheese, softened to room temperature. This is the backbone of the whole dip. It gives the dip its thick, rich texture and acts as the glue that holds everything together. The most important thing here is that it must be softened before you use it. If you try to mix cold cream cheese, you will end up with a lumpy, uneven dip no matter how hard you stir. Pull it out of the fridge at least 20 to 30 minutes before you plan to start, or unwrap it and microwave it for about 15 seconds to soften it quickly.
½ cup sour cream. Sour cream loosens the cream cheese just enough to make the dip smooth and scoopable without making it runny. It also adds its own mild tangy flavor that complements the pickles perfectly. If you do not have sour cream, plain Greek yogurt works just as well and actually adds a little extra protein.
2 tablespoons mayonnaise (optional but recommended). This might seem like an odd addition, but mayonnaise adds a subtle richness and creaminess that rounds out the dip beautifully. It fills in any sharpness and makes the texture even silkier. If you are not a mayo fan, you can leave it out without ruining the recipe — the dip will still be great.
The Pickle Elements
1 cup dill pickles, finely chopped. This is the star of the show. Use whole kosher dill pickles from the refrigerated section of the grocery store if you can find them — they tend to have a fresher, crunchier texture and more vibrant pickle flavor than shelf-stable varieties. Finely chop them into small pieces so the pickle flavor distributes evenly throughout every bite of the dip. If you only have dill pickle chips or spears, those work too — just chop them up small.
2 tablespoons dill pickle brine (juice from the jar). Do not throw away that pickle juice. The brine is where a huge amount of the flavor lives. Adding it to the dip intensifies the pickle taste without adding more solid chunks, and it also helps control the consistency. Start with two tablespoons and add more later if you want a stronger flavor or a slightly thinner texture.
The Seasonings
1 tablespoon ranch seasoning mix. This is a secret weapon in this recipe. Ranch seasoning adds a layer of tangy, herby, buttermilk flavor that makes the whole dip taste more complex and interesting. Use the powdered dressing mix variety, not the dip mix, and check the label if you need a gluten-free option.
½ teaspoon garlic powder. Garlic powder adds a savory depth that the dip needs to feel complete. Do not use garlic salt — that will make the dip too salty and you will lose control of the sodium level.
½ teaspoon onion powder. Same rule applies here — use onion powder, not onion salt. It gives a mellow, slightly sweet savory note that pairs naturally with the pickle flavor.
½ teaspoon dried dill weed, or 1 teaspoon fresh dill if you have it. Fresh dill is always better if you can get it, but dried works perfectly fine in this recipe. It amplifies the dill flavor of the pickles and gives the dip that signature herb brightness.
Salt and black pepper to taste. Season carefully since the pickles and ranch mix are already quite salty. Taste the dip before adding any extra salt, and adjust only if it needs it.
Optional Add-Ins
½ cup shredded sharp cheddar cheese. This makes the dip heartier and adds a slightly sharp, nutty flavor that is really satisfying. Shred it yourself from a block rather than using pre-shredded cheese — freshly grated cheddar melts and mixes better because it does not have the anti-caking powder that bagged cheese contains.
2 tablespoons chopped scallions (green onions). These add a pop of fresh, mild onion flavor and a little color. They are easy to prep and make the dip look really nice in a serving bowl.
2 tablespoons diced jalapeños. For people who like a little heat, diced pickled jalapeños are perfect here. Remove the seeds for medium heat or leave them in if you want it properly spicy. The heat plays really well against the tangy brine.
3 strips cooked bacon, crumbled. This is the addition that made the viral version of this dip so famous. Crispy, smoky bacon in a tangy pickle dip is one of those combinations that just works on every level. It adds texture, flavor, and the kind of indulgence that makes people go back for a fourth and fifth scoop.
For Serving
Thick ridged potato chips like Ruffles or kettle-cooked chips, pita chips, pretzel chips, crackers, and raw vegetables like carrot sticks, celery, cucumber rounds, and bell pepper strips all work beautifully as dippers with this recipe.
Step-by-Step Recipe Method
This is the core section of the recipe. Follow each step carefully and your dip will come out perfectly every single time.
Step 1: Soften the Cream Cheese
Take the cream cheese out of the refrigerator and leave it on the counter for at least 20 to 30 minutes before you start. This is the most important step in the entire recipe, and it is also the one most people skip — which is exactly why so many people end up with a lumpy dip. Cold cream cheese does not blend. It breaks into clumps and leaves uneven pockets in the dip no matter how hard you stir or how powerful your mixer is. Properly softened cream cheese at room temperature will blend in seconds and give you a perfectly smooth, creamy base. If you forgot to take it out in advance, unwrap the block and microwave it for 15 to 20 seconds, then check it. It should feel soft and pliable when you press it gently in the center.
Step 2: Chop and Dry the Pickles
While the cream cheese softens, prepare your pickles. Finely chop 1 cup of dill pickles into small pieces — aim for pieces no bigger than about a quarter inch. Small pieces distribute throughout the dip much more evenly than big chunks, which means every single scoop will have pickle flavor rather than the occasional large chunk. After you chop the pickles, place them on a few layers of paper towel and gently press to absorb as much moisture as possible. This step matters a lot. Pickles carry a lot of water inside them, and if you add wet pickles straight to your dip, the excess liquid will make the whole thing watery and thin within a few minutes. A quick pat-dry keeps the dip thick and creamy from the first scoop to the last. Before you drain the jar, set aside 2 tablespoons of brine to add to the recipe.
Step 3: Mix the Creamy Base Until Smooth
Place the softened cream cheese, sour cream, and mayonnaise into a large mixing bowl. Use a hand mixer on low speed and beat them together until the mixture is completely smooth, lump-free, and well combined. This should take about one to two minutes. If you do not have a hand mixer, a sturdy rubber spatula or wooden spoon will work — just make sure you really work out any lumps. A smooth base means a smooth dip, so do not rush this step. You want to see a uniform, creamy mixture with no visible streaks of cream cheese before you move on.
Step 4: Add the Seasonings
To the smooth cream cheese mixture, add the ranch seasoning mix, garlic powder, onion powder, dried dill, and the 2 tablespoons of pickle brine. Stir everything together thoroughly until the seasonings are fully incorporated and evenly distributed through the base. Taste the mixture at this point — before you add the pickles — so you can get a sense of the base flavor. The seasoning should smell fragrant and taste tangy and slightly herby. If it seems bland, add a pinch more garlic powder or an extra squeeze of pickle brine. Hold off on adding salt until after the pickles go in, since pickles are already quite salty.
Step 5: Fold In the Pickles and Add-Ins
Now it is time to add the chopped, dried pickles to the bowl. Use a spatula and gently fold them into the seasoned cream cheese mixture rather than stirring aggressively — this keeps the dip thick and prevents it from getting broken down and loose. If you are adding shredded cheddar, scallions, jalapeños, or crumbled bacon, fold those in at this stage too. Once everything is incorporated, taste the dip again. If you want more pickle flavor, add another tablespoon of brine and stir. If it tastes like it needs more salt, add a small pinch and taste again. If it is too thick for your liking, a splash of pickle juice will loosen it up to your preferred consistency.
Step 6: Chill the Dip
Transfer the finished dip to a clean serving bowl or an airtight container and cover it tightly with plastic wrap or a lid. Put it in the refrigerator for a minimum of 30 minutes before serving. This resting time is not optional if you want the best possible result. During this time, all of the flavors — the tangy brine, the garlic, the dill, the ranch — settle and blend together into a cohesive, well-rounded flavor that is significantly better than the dip tastes right out of the bowl. If you have the time, let it chill for one to two hours, or even overnight. The difference in flavor between a freshly made dip and one that has rested in the fridge for a few hours is genuinely noticeable. The overnight version is always the best.
Step 7: Garnish and Serve
When you are ready to serve, take the dip out of the fridge and give it a good stir. If it has thickened in the fridge — which is completely normal — add a small splash of pickle brine and mix until it is back to your preferred consistency. Transfer it to a pretty serving bowl if you have not already, and garnish the top with a few sprigs of fresh dill, a couple of thin pickle slices, a pinch of shredded cheese, or a sprinkle of dried dill. Set out your chosen dippers alongside the bowl and serve immediately. If you are serving this outdoors in warm weather, keep the dip bowl nested inside a larger bowl filled with ice to keep it chilled and safe to eat.
Variations in the Recipe
Once you know the base recipe, you can take pickle dip in a dozen different directions. Here are the best variations to try.
Spicy Pickle Dip
If you love heat, this is the version to make. After you have mixed the base dip, fold in two tablespoons of diced pickled jalapeños with the seeds removed for a medium heat level, or leave the seeds in if you want it properly hot. You can also add a good squeeze of Sriracha sauce or a pinch of cayenne pepper to dial up the heat even further. The spicy version works especially well at game day parties because the heat and the tangy brine together create an incredibly bold, craveable combination that pairs perfectly with salty chips and cold drinks.
Bacon Ranch Pickle Dip (The Viral Version)
This is the version that broke the internet and turned pickle dip into a household name. Cook three to four strips of bacon until completely crispy, let them cool, and crumble them into small pieces. Add the bacon into the base dip along with a tablespoon of extra ranch seasoning and a couple of tablespoons of diced scallions. The smoky, salty bacon against the cold, tangy pickle dip is one of those flavor combinations that just makes total sense. This version is richer and more indulgent than the classic, and it tends to be the first bowl emptied at any party spread.
Baked Hot Pickle Dip
If you want something warm and bubbly instead of cold, baked pickle dip is the way to go. Mix all the ingredients together as described in the base recipe, then transfer the mixture into a 7×10 inch baking dish. Spread it out evenly and top the surface generously with shredded mozzarella, extra sharp cheddar, and a few additional chopped pickles. Bake at 375°F (190°C) for 21 to 23 minutes until the dip is heated through and bubbling around the edges, then switch the oven to broil for two to three additional minutes to get the top golden and slightly browned. Pull it out and serve immediately with thick ridged potato chips or pita chips. This version is especially perfect for fall and winter gatherings.
Lighter Greek Yogurt Pickle Dip
If you want all the flavor with a bit less richness, swap the sour cream in the recipe for an equal amount of plain Greek yogurt. Greek yogurt has nearly the same tangy flavor as sour cream but more protein and less fat, and it mixes into the cream cheese just as smoothly. You can also use reduced-fat cream cheese (sometimes labeled as Neufchâtel) without any real loss of flavor. Skip the mayonnaise in this version and leave out the bacon and extra cheese. The result is a dip that feels lighter but still has that full, bold pickle flavor that makes this recipe so good.
Dairy-Free Pickle Dip
This recipe adapts surprisingly well to a dairy-free version. Use a dairy-free cream cheese like Miyoko’s or Daiya brand, which both have a creamy texture and neutral flavor that works well here. Replace the sour cream with a plain, unsweetened coconut yogurt or a cashew-based sour cream alternative. Skip the cheddar cheese or substitute a shredded dairy-free cheddar. The pickle juice, garlic, dill, and ranch seasoning are all naturally dairy-free, so the rest of the recipe stays the same. The texture and flavor will be very close to the original, and no one at your table will be able to tell the difference.
Pickle Dip Cheese Ball
This is a fun way to serve the same dip in a completely different form. Make the base recipe exactly as written, then scoop the entire mixture onto a large sheet of plastic wrap. Use your hands (through the wrap) to gently shape it into a round ball. Wrap it up tightly, twisting the ends to seal it, and refrigerate for at least one hour or until it is firm enough to hold its shape. Just before serving, unwrap the ball and roll it in a coating of your choice — fresh chopped dill, crushed crackers, shredded cheese, or chopped pecans all work beautifully. Place it on a serving board surrounded by crackers and chips. It makes a stunning centerpiece for a party table.
Mistakes to Avoid
Even a simple recipe like this one has a few pitfalls. Here are the most common mistakes people make and how to avoid them completely.
Using Cold Cream Cheese
This is the number one mistake that ruins pickle dip. When cream cheese is cold and firm, it simply does not blend properly. No matter how long you stir or how powerful your hand mixer is, cold cream cheese will break into lumps and leave you with a bumpy, uneven dip. The fix is completely simple — just plan ahead and take the cream cheese out of the fridge 20 to 30 minutes before you start. If you forget, microwave it for 15 to 20 seconds in its unwrapped state and it will be soft enough to work with. This one step makes the difference between a lumpy mess and a perfectly silky dip.
Skipping the Chill Time
A lot of people make the dip, taste it immediately, and think it is just okay. Then they serve it at a party two hours later and everyone goes crazy over it. The chilling time is not just about temperature — it is about flavor development. When the dip rests in the fridge, all the individual seasonings and ingredients start to blend and communicate with each other. The garlic softens, the dill becomes more pronounced, and the pickle flavor deepens and spreads through every part of the dip. Thirty minutes is the minimum, but one to two hours is significantly better. If you are making this for a party, make it the night before and you will have the best possible version waiting for you the next day.
Not Drying the Pickles Before Adding Them
Chopped pickles are wet, and that moisture will absolutely water down your dip if you do not deal with it. After you chop the pickles, lay them on a paper towel and press gently to absorb as much liquid as possible before adding them to the bowl. This takes about thirty seconds and makes a meaningful difference in the final texture. A dip made with undrained pickles will look fine at first but will start to thin out and become watery within twenty or thirty minutes of sitting at room temperature. Drying the pickles keeps it thick and creamy from start to finish.
Using Garlic Salt or Onion Salt Instead of the Powder
This is a subtle mistake that can completely throw off the flavor of the dip. Garlic salt and onion salt both contain added sodium, which makes it very easy to accidentally make the dip too salty before you even get a chance to taste and adjust. Pickles are already salty, the ranch seasoning contains salt, and the brine adds more. Using garlic salt or onion salt on top of all that is usually too much. Always use garlic powder and onion powder, and season with plain salt at the very end only if the dip actually needs it after tasting.
Adding Too Much Pickle Juice Too Fast
Pickle brine is an important ingredient in this recipe, but it needs to be added carefully. If you dump in too much at once, the dip becomes thin and almost pourable rather than thick and scoopable. Start with two tablespoons as directed, stir it in fully, then taste and assess the consistency. If you want it slightly looser or more intensely flavored, add one more tablespoon and check again. You can always add more liquid but you cannot take it out, so go slowly and taste as you go. If you do accidentally add too much, mix in a little extra cream cheese to bring the thickness back.
Overloading the Dip with Add-Ins
The add-ins are fun, but there is a point where too many of them starts to overpower the pickle flavor that makes this dip worth making in the first place. If you are putting in bacon, cheddar, jalapeños, and scallions all at once, you risk creating a dip that is just a heavy, chunky mess where nothing really shines. Pick one or two add-ins and do them well. If you want to make the full loaded version, use smaller amounts of each add-in so that the flavor stays balanced and the pickle taste still comes through clearly.
How to Store Leftover Pickle Dip
Store any leftover dip in an airtight container in the refrigerator for up to four to five days. Before you serve it again, give it a good stir — the dip tends to thicken up after sitting in the fridge, and a splash of pickle brine stirred in will bring it right back to the right consistency. Do not try to freeze this dip. Because it is dairy-based, the cream cheese and sour cream will separate and become grainy and unpleasant after thawing, and there is really no fixing it at that point. It is best made fresh or a day ahead and stored refrigerated until you are ready to serve.
Conclusion
Pickle dip is one of those recipes that earns its place in your regular rotation after the very first time you make it. It is fast, easy, and made from ingredients that are not hard to find. The flavor is bold, tangy, creamy, and genuinely addictive in a way that is hard to describe until you try it for yourself. Whether you make the simple classic version with just cream cheese, pickles, and seasonings, or you go all in with the loaded bacon and cheddar version, the result is always a dip that disappears faster than anything else on the table.
Start with the base recipe and get comfortable with it, then try one of the variations to see which one becomes your personal favorite. Make it the night before a party so it has time to develop its full flavor, and do not forget to put out the best chips you can find because this dip deserves a worthy partner. Once you make it, the days of buying store-bought dip are over.
If you try this recipe, come back and leave a comment to let me know how it turned out. Share a photo, tell me which version you made, and let me know if you tried any of your own add-ins. I would love to hear about it.
FAQs
Can I make pickle dip ahead of time? Yes, and honestly you should. Pickle dip tastes noticeably better after it has had time to rest in the refrigerator. The flavors blend together and deepen significantly over a few hours. You can make it up to 24 hours in advance and store it covered in the fridge. When you are ready to serve, give it a good stir and add a small splash of pickle brine if it has thickened too much. Making it the night before a party is the best approach for maximum flavor.
How long does pickle dip stay fresh in the fridge? Pickle dip keeps well in the refrigerator for four to five days when stored in a sealed, airtight container. Stir it before each serving and adjust the consistency with a little pickle juice if needed. Because it is dairy-based, do not leave it sitting out at room temperature for more than two hours, especially in warm weather. After that window, the cream cheese base can become unsafe to eat.
What can I use instead of sour cream? Plain Greek yogurt is the best substitute and works just as well in this recipe. It has a similar creamy texture and tangy flavor but with more protein and less fat. Full-fat Greek yogurt gives the closest result to sour cream. If you do not have Greek yogurt either, you can add a bit more cream cheese and a small amount of extra pickle brine to thin it out, though the flavor will be slightly richer and less tangy without the sour cream.
Can I use pickle relish instead of chopped pickles? Absolutely. Dill pickle relish is actually a great shortcut when you do not want to do all the chopping. The key is to drain it really well before adding it to the dip, because relish tends to be wetter than hand-chopped pickles. Press it through a fine mesh strainer or squeeze it in a paper towel to get rid of as much liquid as possible first. The flavor will be just as good, and it saves you a few minutes of prep work.
Why did my pickle dip turn out watery? There are two common causes for a watery dip. The first is adding too much pickle brine at once — always add it gradually and taste as you go. The second and more common cause is adding pickles without patting them dry first. Chopped pickles release a lot of moisture once they are cut, and that liquid will thin out the dip quickly. If your dip is already too thin, stir in additional softened cream cheese one tablespoon at a time until the texture firms back up, then refrigerate for at least 30 minutes before serving.
Is pickle dip gluten-free? The dip itself is made from naturally gluten-free ingredients — cream cheese, sour cream, pickles, and spices. However, ranch seasoning mix can sometimes contain gluten depending on the brand, so always check the label. Hidden Valley’s classic ranch seasoning is gluten-free, but others may not be. As long as you confirm the seasoning is gluten-free and serve the dip with gluten-free dippers like vegetable sticks or certified GF chips, the whole thing is safe for people avoiding gluten.
Can I make this into a baked dip? Yes, and the baked version is absolutely delicious. Make the dip exactly as described in the recipe, then spread it into a baking dish, top it with shredded mozzarella and cheddar, and bake at 375°F for 21 to 23 minutes until it is hot and bubbling. Broil for two to three minutes at the end to get the cheese golden and slightly browned on top. Serve it immediately while it is hot and melty. This version is especially great in the colder months or when you want something warm and comforting at a gathering.
What are the best chips to serve with pickle dip? Thick, ridged potato chips like Ruffles or kettle-cooked chips are the top choice because they are sturdy enough to scoop up a generous amount of dip without breaking. Thin chips will snap under the weight of the dip and are frustrating to use. Pita chips and pretzel chips are also excellent options. For a lighter spread, raw vegetables like carrot sticks, celery, and cucumber rounds work really well and give you a nice crunchy contrast to the creamy dip.
Can I freeze pickle dip? No, freezing is not recommended for this recipe. Dairy-based dips made with cream cheese and sour cream do not freeze well. When they thaw, the dairy proteins separate and the texture becomes grainy, curdled, and watery — and unfortunately there is no way to fix it after that happens. The good news is that this dip stores beautifully in the refrigerator for up to five days, which is usually more than enough time to finish it even if you made a big batch.
Can I use sweet pickles instead of dill pickles? You can, but the flavor of the dip will be completely different. Sweet pickles like bread-and-butter pickles have a sugary, mild taste that is the opposite of the sharp brine that makes dill pickle dip so distinct. The result with sweet pickles will be a milder, sweeter dip that some people enjoy, but it is not the classic tangy pickle dip that most people are looking for. If you love sweet pickles and want to experiment, go for it — just know that you are making a different dip rather than a variation of the same one.